28 January 2009

Scallops risotto - Risotto aux noix de St Jacques

I used to never make risotto but somehow I have developed a taste for it which means I made it again a couple of nights ago, this time I had scallops and thought why not making them in a risotto (I still need to give you the last recipe I prepared scallops with).
It takes about 20 to 25 mn for the risotto to cook.

Scallops risotto / Risotto aux noix de Saint Jacques

For 2 people

Ingredients
1 Tbsp olive oil
1 Shallot thinly sliced
3/4 cup / 150 gr of Arborio risotto rice
1 small bottle / 187 ml of dry white wine
1 1/2 cup / 350 ml Chicken stock
1/2 lemon zest and juice to taste
3 or 4 cloves of garlic (depending on how much you like it) thinly chopped
1 tomato chopped up
2 scallops (or more depending on their size, here in the US I found some fairly big ones so 2 were enough) chopped in smaller pieces
Salt & Pepper to taste
1/4 cup Parmesan finely grated

Method
Before you start warm up your chicken stock.
In a saucepan pour 1/2 Tbsp olive oil and sauté the shallot, when it is translucent (not brown) pour the rice and toss until it has absorbed the oil, then pour the wine over and stir over medium heat until most of it is absorbed.
Then add 1/2 cup of warm chicken stock and stir continuously until mostly absorbed, then continue with the rest of the stock adding 1/2 cup at a time until absorbed.
Halfway through add the lemon zest and juice.
When pouring the last 1/2 cup of stock take a separate pan and in 1/2 Tbsp olive oil sauté half of the garlic and tomato (do not brown the garlic) then when the tomato is cooked through add the rest of the garlic and the scallops pieces, salt and pepper and sauté till cooked through.
While the scallops are cooking the liquid in the rice should be all absorbed, add the Parmesan and stir.
At this point add the cooked scallops to the risotto, stir and check the seasoning and adjust if necessary.
Serve at once this rich and creamy mixture.

25 January 2009

The GF Pizza Crust challenge

Last August we stayed at the "B&M Zoo" family cabin on Flathead lake in Montana and they challenged me to create a gluten free pizza crust as a major part of the family is gluten intolerant and it is always a challenge for them to find tasty GF pizza. Fast forward to last week and I received a mail enquiring of my progress, so I finally got to work and came up with the below recipe, my home committee of gluten lovers approved thumbs up of this new gluten free pizza crust, so I guess it's time to share it.

Gluten free pizza crust
Ingredients
1 cup / 180 gr Rice flour
1 cup / 145 gr Sorghum flour
1/2 / 80 gr cup Tapioca flour (if not available you can make it by grinding the tapioca pearls in a clean coffee grinder or use corn starch)
1/4 cup / 40 gr potato starch
2 tsp Xanthan gum (very important element in all gluten free baking, it is the "binding" agent that acts similarly to gluten)
1 tsp salt
1 egg
2 Tbsp olive oil
1 cup tepid water (can be increased by 1/4 cup depending on the dryness of your various flours, also rice flour absorbs liquid a lot)
2 tsp active dry yeast
1/2 tsp sugar

Method
Turn on your oven to 150 F.
Before you start measuring all the dry ingredients, mix the yeast with the tepid water and sugar and and set aside (it will start bubbling up a bit).
Then measure your dry ingredients in the mixing bowl of a stand up mixer (rice, sorghum, tapioca, potato, xanthan gum, salt). Pour the water/yeast mixture, the egg and mix with the paddle of the mixer for 4 or 5 mn till all well incorporated, then add the olive oil.
The dough will be a bit sticky but it shouldn't be too wet so after the first cup of water/yeast mixture you can add up to 1/4 cup of water but do it progressively.
Once all incorporated cut a third of the dough and roll it out on a Silpat or if you don't have one on a sheet of parchment paper cut to the size of a jelly roll pan, to the thickness you desire (I rolled mine very thinly and it was perfect), spray or baste a little olive oil on top so it won't dry out, turn of the oven and place the jelly roll pan and let the dough rise in the pre-heated oven for 30 mn.
Roll the rest of the dough on another pan and let it rise in the turned off oven as well. (If you have removable bottom tart pans these will also work just fine).
Then turn on the oven to 375 F and pre-bake the dough for 15mn, take it out and increase the oven temperature to 425 F and place the toppings of your choice on your pizza crust (I kept mine simple with tomato sauce, anchovies, black olives and mozzarella cheese) and put it back in the oven to finish the baking process for a further 15/20 mn.
The result will be a thin crispy crust gluten free pizza.

09 January 2009

Succés au Chocolat - "Chocolate success"

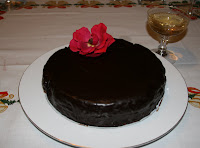
On Christmas day I promised you the recipe for the cake in the photo, well finally it has arrived.
It is my version of a famous french cake called: Succés au Chocolat. It is made of 3 components: a layer of chocolate ganache encased between 2 hazelnut cakes then covered in a chocolate glazing.
It is easier to make than it seems. The first step is making the cakes, then the ganache then the glazing.


Succés au chocolat
2 spring form baking tins 24 cm/9" in diameter
2 small cooling racks (not smaller than 9" in width and length)
1 plate/dish larger than the cake diameter
1 serving plater

Hazelnut cakes
Ingredients
8 eggs
400 gr sugar
200 gr melted unsalted butter
200 gr ground hazelnuts (or almonds - almond meal) I usually ground the hazelnuts rather than buying them already grounded, it stays fresher that way.
4 TBSP all purpose flour

Method
Separate the egg whites from the yolks (you can use the yolks in a custard) and whip the whites till firm, then add the sugar (like you would do for meringue).
Then gently fold in the melted and cooled down butter, the ground hazelnuts/almonds and finally the flour.
When all well integrated pour half into each greased baking tin that you have previously lined with baking paper.
Place in pre-heated oven at 385/390 F and bake for 20 to 30 mn (depending on your oven), the outside should be crispy and dry and the inside moist but cooked.
When baked turn upside down on a cooling rack and remove the baking paper (if you wait it will stick and will be very hard to remove), let the cakes cool.

Chocolate Ganache
Ingredients
200 gr dark chocolate (it is best to use chocolate that has a cocoa content of 60% or more)
200 gr heavy whipping cream
30 gr honey

Method
Chop the chocolate into smaller pieces and place in a saucepan in a hot water bath (bain marie) then let it melt.
In a separate saucepan bring the cream and honey to a boil then let the liquid cool down.
Once the chocolate is melted and cooled down a bit add the cream/honey mix while mixing continuously, at first it will kind of solidify but keep adding the liquid and stirring vigorously then you will obtain a smooth and shinny cream like chocolate ganache. Let it cool down at room temperature till it starts "gelling" a bit.

Chocolate glaze (glaçage au chocolat)
Ingredients
90 gr extra dark chocolate (more than 70% cocoa content)
90 gr normal dark chocolate (minimum 52% cocoa content)
125 gr unsalted butter

Method
Cut chocolate in smaller pieces and place in a saucepan in a hot water bath (bain marie), add the butter and let it all melt.
This will be done last and after the cake has been assembled as it has to be poured hot over the cake.

Assembling the cake
Place 1 hazelnut cake upside up on a cooling rack, spread the chocolate ganache evenly on top of it then place the second cake on top of the ganache and place it all in the fridge or freezer for faster result to cool down, the ganache will start getting harder but not too hard (like butter left out of the fridge for 30mn).
At that point take it out and place the cooling rack with the cake on top of the large plate and pour over it the warm/hot glaze/glaçage it should be quite liquid, it will spill over (thus the larger plate) and spread it evenly with a long spatula, cover the sides and smooth them too.
At this point you can delicately remove the cake from the cooling rack using a large spatula (or 2) and place it on a serving platter (it can be a little bit tricky so if you don't feel confident enough wait till the chocolate glazing has cooled down to move the cake and use the left over glaze to touch up). When all the cake is covered place in the fridge and let it cool down till the chocolate solidifies.
Keep it in the fridge and bring it out 1h before serving it.
In my opinion this cakes tastes best the day after making it so plan ahead. It's great for special occasions and tastes totally delicious.
You can also freeze it properly wrapped and use in a couple of weeks, just make sure to take it out of the freezer 24h before using it to thaw properly in the fridge.

Bon appétit and bonne année!

01 January 2009

Happy New Year from Paris


Wishing you all a very happy and healthy 2009.

Stay tuned for more recipes soon...